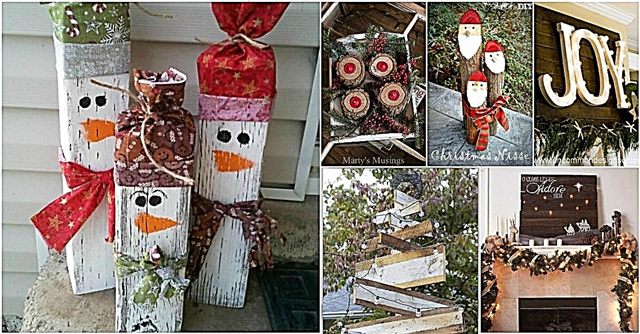
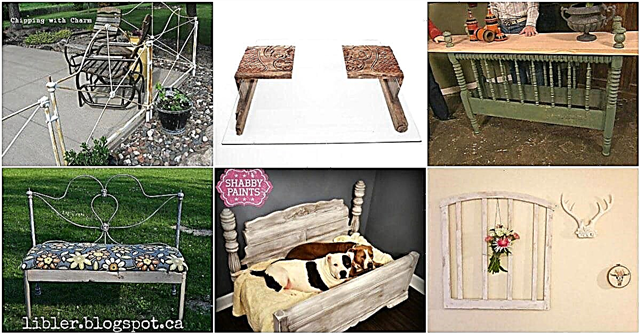
Niszczenie rzeczy nigdy nie jest zabawne i często oznacza wyrzucenie czegoś przed czasem. Możesz mieć mnóstwo zepsutych filiżanek do herbaty, ramek do zdjęć, mebli lub innych typowych przedmiotów gospodarstwa domowego, które Twoim zdaniem należą do kosza.
Wręcz przeciwnie, istnieje wiele różnych projektów, które możesz wykonać z tymi zepsutymi przedmiotami i stworzyć oszałamiający wystrój wnętrz i na zewnątrz, wszystko z rzeczy, które możesz uznać za śmieci. Zebraliśmy listę 100 różnych projektów, które wymagają tych zepsutych elementów lub zwykłych śmieci domowych.
Zmiana przeznaczenia to świetny sposób, aby trzymać rzeczy z dala od wysypiska i nadać domowi odrobinę uroku. Te projekty są stosunkowo łatwe, zajmują niewiele czasu, a co najważniejsze, pozwalają całkowicie zmienić przeznaczenie tego kosza na coś pożytecznego.
Chwyć zepsuty przedmiot gospodarstwa domowego i przyjrzyj się różnym sposobom, w jakie możesz go przywrócić do życia. Wiesz, co mówią - śmieci jednej dziewczyny to skarb drugiej dziewczyny.
Zamień uszkodzoną ramkę na zdjęcie w uchwyt na kolczyk
Kiedy stłuczesz (lub twoje dzieci lub zwierzęta stłuczą) szybę z ramki na zdjęcia, nie wyrzucaj podstawy. Zamiast tego użyj go, aby stworzyć wspaniały i bardzo funkcjonalny wyświetlacz kolczyków. Będziesz potrzebował jakiegoś drutu (drut obrazkowy działa naprawdę dobrze) do zawieszenia kolczyków. Po prostu przeciągnij drut po ramie, a następnie zawieś kolczyki. To świetny pomysł na prezent dla dziewczynek w każdym wieku. Możesz biegać tak dużo drutu, ile chcesz. Jeśli masz dłuższe kolczyki, które zwisają, zrób dłuższe poziomy.
Instrukcje dotyczące majsterkowania i uznanie projektu - Kevinandamanda

Stwórz kuchnię do zabawy w zepsutym centrum rozrywki
Zamiast ciągnąć to stare centrum rozrywki na wysypisko, poświęć kilka godzin i zamień je w uroczą kuchnię do zabawy dla swojej małej dziewczynki. Środek nie musi być w idealnym stanie, ponieważ możesz wzmocnić wszystko, co tego potrzebuje, a tak naprawdę nie oczekuje się, że będzie utrzymywał dużą wagę. Wystarczy odrobina farby i wyobraźnia, aby zmienić ten stary łobuz w coś, z czego każda mała dziewczynka będzie czerpać wiele godzin przyjemności. Poza tym to świetne miejsce do przechowywania wszystkich zabawek do gotowania.
Instrukcje dla majsterkowiczów i kredyt projektu - Diynetwork

Utwórz centrum recyklingu ze starym koszykiem
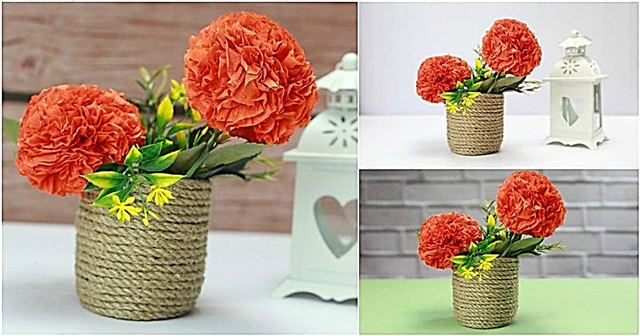
Jeśli masz dość duży kosz, który wydaje się rozpadać w szwach, możesz zmienić jego przeznaczenie w świetne centrum recyklingu. Kosz tak naprawdę nie musi być w stanie niczego pomieścić, więc otwory w dnie są idealne. Po prostu wkładasz kosze na śmieci do wiklinowego kosza do recyklingu, a następnie oznaczasz sekcje, aby wiedzieć, gdzie wszystko idzie. Pomaga to nie tylko dobrze wykorzystać ten podarty kosz, ale także zapewnia naprawdę atrakcyjne miejsce do przechowywania surowców wtórnych.
Instrukcje dotyczące majsterkowania i uznanie projektu - Bhg

Twórz nowe letnie klapki od starych
Zamiast wyrzucać te klapki, gdy paski się poluzują i nie możesz ich trzymać razem, rozważ stworzenie z nich wszystkich nowych butów. Wystarczy odrobina materiału i zrobisz te urocze, plecione japonki, które są idealne na lato i pozwolą Ci zachować te stare buty, nawet jeśli wyglądają, jakby były gotowe do kosza na śmieci. Możesz nawet zrobić plecione paski ze starych t-shirtów lub innej odzieży, która ma dziury i musi zostać wyrzucona, więc ta jest podwójna.
Instrukcje dotyczące majsterkowania i uznanie projektu - Makeit-loveit

Zamień butelki z balsamem dla niemowląt w stacje ładowania telefonów komórkowych
Butelki z balsamem dla niemowląt mają tendencję do wyrzucania do kosza, gdy są puste. W końcu co mógłbyś zrobić z tymi pustymi butelkami? Możesz stworzyć naprawdę poręczną stację ładującą do telefonu komórkowego, która chroni przewody przed wyrzuceniem na zewnątrz. Wystarczy odrobina materiału, trochę cięcia i trochę czasu, aby stworzyć tę naprawdę poręczną stację ładującą do telefonu komórkowego, która utrzymuje telefon i przewód tuż obok wtyczki, dzięki czemu oszczędzasz miejsce, a przewód nie leży na podłoga (która, nawiasem mówiąc, jest dla niej złym miejscem, jeśli masz zwierzęta).
Instrukcje dotyczące majsterkowania i uznanie projektu - Makeit-loveit

Wykonuj oprawy oświetleniowe ze starych drucianych koszyków
Zamiast wysyłać te stare druciane kosze na wysypisko, nawet jeśli są całkowicie zużyte, zamień je w naprawdę atrakcyjne oprawy oświetleniowe. Nawet jeśli kosze mają luźne druty lub otwory w dnie, możesz ich użyć do stworzenia inspirowanych Anthropologie opraw oświetleniowych, które będą świetnie wyglądać w kuchni. Wystarczy przygotować kosz, a następnie podłączyć do lampy wiszącej. Jeśli chcesz, możesz go wcześniej pomalować, aby pasował do wystroju kuchni, lub po prostu zostawić go tak, jak jest.
Instrukcje dla majsterkowiczów i kredyt projektu - Ashleyannphotography

Użyj uszkodzonych doniczek jako znaczników ogrodowych
Jeśli masz garnki z terakoty, które są nieco gorsze w zużyciu, nie musisz ich wyrzucać. Możesz ich używać do tworzenia wspaniałych markerów ogrodowych. Działa to nawet wtedy, gdy masz uszkodzony tylko jeden garnek. Po prostu weź kilka kawałków i zapisz nazwy swoich kwiatów, ziół lub warzyw za pomocą magicznego markera, aby się nie zsunęły lub możesz być naprawdę kreatywny i pomalować imiona (możesz również stworzyć na nich trochę grafiki ). Jeśli masz kilka starych doniczek, które nie nadają się do sadzenia, użyj ich do oznaczenia wszystkiego w ogrodzie.
Instrukcje dla majsterkowiczów i kredyt na projekt - Mało domów

Zamień starą komodę w przytulną ławkę
Uwielbiam wszystko w tym projekcie zmiany mebli! Instrukcje są proste i jeśli uda ci się kupić jedną z tych starych komód za tanią, to jest to projekt, który musisz zrobić!
Instrukcje dla majsterkowiczów i kredyt projektu - projekty Grillo

Zamień Broken Terra Cotta w dynie
Te stare połamane donice z terakoty można wykorzystać do stworzenia pięknych dyń. Możesz to zrobić z dowolną ilością ceramiki, więc jeśli masz połamane talerze lub spodki, użyj ich również. Wystarczy zrobić małe kawałki, a następnie ułożyć na piankowej kulce mozaikę. To również świetny projekt na Boże Narodzenie, tylko możesz użyć świątecznych kolorów do tworzenia ozdób. Są naprawdę łatwe do wykonania i bije po prostu wyrzucanie połamanych donic i talerzy do kosza.
Instrukcje dla majsterkowiczów i kredyt projektu - Craftsncoffee

Twórz grafikę z pękniętymi płytami
Zamiast natychmiast wyrzucać te popękane talerze, dlaczego nie zamienić ich w dzieło sztuki, które możesz umieścić na ścianie w kuchni lub jadalni? To świetny projekt dla talerzy, które są faktycznie podzielone na dwie lub więcej części. Prawdopodobnie nie będziesz chciał ich sklejać z powrotem, jeśli są rozbite, ale jeśli masz tylko kilka większych kawałków, możesz je po prostu skleić w ten sposób i użyć do dekoracji ścian. To naprawdę świetny projekt dla starszych potraw, których po prostu nie można się pozbyć, nawet jeśli są zepsute.
Instrukcje dla majsterkowiczów i kredyt projektu - Życie domowe

Zrób kąpiel dla ptaków z pękniętymi doniczkami i talerzami
Użyj pękniętych donic z terakoty i połamanych lub popękanych talerzy, aby stworzyć piękną kąpiel dla ptaków w swoim ogrodzie. Możesz użyć donic o różnych rozmiarach, więc jeśli masz kilka uszkodzonych, jest to świetny sposób na ich ponowne przeznaczenie. Wystarczy je pomalować (jeśli chcesz), aby były nieco wyjątkowe, a następnie złożyć. Z przyjemnością lepiej wykorzystasz te popękane talerze i donice, a ptaki też cię za to pokochają.
Instrukcje dla majsterkowiczów i kredyt na projekt - Patriciaspots

Zrób torebkę wielokrotnego użytku z Broken Umbrellas
Kiedy metal w parasolce pęka, zwykle jest to czas na kosz na śmieci. Teraz jednak możesz użyć tkaniny z tego parasola, aby stworzyć te naprawdę zgrabne składane torby wielokrotnego użytku. Wymagane jest trochę szycia, ale ogólnie rzecz biorąc, tworzenie tych małych torebek jest naprawdę łatwe i składają się w rolkę, dzięki czemu można je nosić ze sobą, gdziekolwiek się wybierasz. Świetnie sprawdzają się podczas improwizowanych zakupów, kiedy potrzebujesz torby wielokrotnego użytku do zabrania rzeczy do domu. Są tak małe, że możesz je trzymać w torebce i nigdy nie wiesz, że tam jest.
Instrukcje dotyczące majsterkowania i uznanie projektu - Untrendylife

Twórz koraliki z rozbitych butelek
Prawdopodobnie normalnie wyrzuciłbyś zepsutą butelkę. Jednak nie musisz. Możesz użyć tej metody zamiast tego, aby stworzyć piękne szklane koraliki z tej butelki. Następnie możesz użyć koralików do wykonania dowolnej liczby innych rzemiosł, od biżuterii po dzwonki wiatrowe lub po prostu cokolwiek chcesz. Należy pamiętać, że może to być niebezpieczna jednostka, dlatego należy zawsze zachować ostrożność i chronić oczy przed odłamkami szkła. Jeśli jednak uda Ci się to pojąć, nie ma ograniczeń co do tego, co możesz stworzyć z tych starych butelek.
Instrukcje dla majsterkowiczów i kredyt projektu - Instructables

Zrób dwa biurka z rozbitego stołu
Jeśli masz stół kuchenny, który jest porysowany, połamany lub w inny sposób uszkodzony lub taki, którego już tak naprawdę nie potrzebujesz, nie wyrzucaj go. Zamiast tego użyj go, aby stworzyć dwa urocze biurka ścienne, które z pewnością będą hitem w Twoim domu. Naprawdę nie potrzebujesz samego środka stołu, więc jest to świetny projekt dla stołów, które są naprawdę uszkodzone w środku. Po prostu odcinasz końcówki, malujesz je lub bejcujesz, a następnie mocujesz do ściany.
Instrukcje dotyczące majsterkowania i uznanie projektu - Migonishome

Zrób lampki do herbaty z kapsli
Ok, więc kapsle do butelek nie są tak naprawdę zepsute, gdy je wyrzucasz, ale z pewnością i tak można je zmienić. Możesz ich użyć do stworzenia uroczych świec typu tealight, które są idealne, gdy potrzebujesz wielu świec (pomyśl o ślubach lub innych większych imprezach). Wystarczy wyczyścić nakrętki butelek, dodać knot, a następnie wlać trochę wosku. Wosk faktycznie pochodzi ze stopionych kredek, więc jest to podwójna liczba. Możesz trzymać te kapsle z dala od wysypiska i masz coś, co możesz zrobić z tymi starymi połamanymi kredkami.
Instrukcje dla majsterkowiczów i kredyt na projekt - Austinweddingblog

Twórz nowe kredki od złamanych
Zamiast rzucać połamanymi kredkami, zrób z nich nowe tęczowe kredki. To taki prosty projekt, a dzieci będą absolutnie zachwycone tymi tęczowymi kredkami. Potrzebujesz kilku puszek, pustych butelek na receptę lub tych małych plastikowych pojemników, w których znajduje się folia, i kilka połamanych kredek. Zasadniczo topi się kredki w puszkach (pamiętaj, aby najpierw je dokładnie wyczyścić), a następnie wlewasz do butelek, aż zestalą się. Kredki mają idealny rozmiar i możesz je zrobić w dowolnej liczbie kolorów - w zależności od tego, ile masz połamanych kredek.
Instrukcje dotyczące majsterkowania i uznanie projektu - Momtastic

Użyj połamanych płyt do pokrycia gruntu
Chociaż z pewnością nie będziesz chciał połamanych talerzy na swoim prawdziwym podwórku, możesz ich użyć zamiast ściółki, aby nadać niektórym obszarom trochę koloru. Zamiast wypełniać wokół drzew na przykład ściółką lub kamykami, użyj połamanych talerzy lub doniczek z terakoty. Możesz zrobić je we wszystkich jednym kolorze, aby wyglądały naprawdę elegancko lub połączyć je, aby uzyskać bardziej zabawny i ekscytujący wygląd. Jest o wiele tańszy niż żwir z mulczu i grochu i zapewni naprawdę wyjątkowy wygląd w ogrodach.
Instrukcje dla majsterkowiczów i kredyt na projekt - terapia mieszkania

Użyj łamanych płyt jako obrzeży ogrodowych
Możesz użyć połamanych talerzy i spodków jako obrzeża wokół ogrodów i drzew. Jeśli masz jakąś starą porcelanę, z którą naprawdę nie możesz się rozstać, użyj tych talerzy, aby stworzyć piękną obramowanie obszarów ogrodowych. Talerze popękane lub wyszczerbione można przełamać na pół (oczywiście ostrożnie), a następnie połówki po prostu wbić w ziemię. Możesz użyć tych samych kolorów lub trochę je pomieszać. Pomaga to dbać o te talerze i zapewnia naprawdę niedrogie, ale piękne obrzeża do ulubionych przestrzeni zewnętrznych.
Instrukcje dla majsterkowiczów i kredyt na projekt - Wondermom

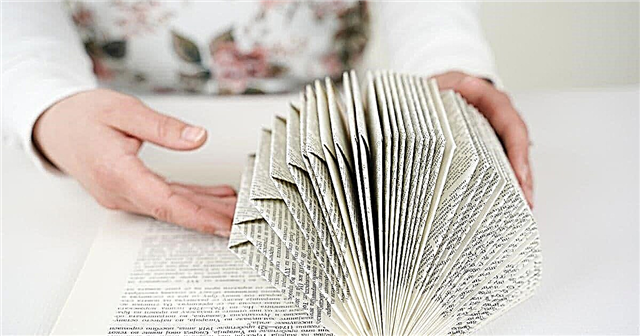
Zmień starą książkę w książkę z grafikami
Jeśli masz stare książki (wiesz, te, w których brakuje połowy stron), nie musisz ich wyrzucać. Możesz użyć starych książek w twardej oprawie, aby stworzyć naprawdę schludną i naprawdę funkcjonalną książkę z grafikami, która zawiera wszystkie przybory plastyczne Twojego dziecka. Są świetne w podróży, ponieważ zajmują mało miejsca, a ponadto mają bardzo sprytny mały uchwyt ułatwiający przenoszenie. Potrzebujesz trochę materiału do wykonania uchwytów na ołówki lub kredki, a następnie rączki i oczywiście materiałów artystycznych.
Instrukcje dla majsterkowiczów i kredyt projektu - Cosmocricket

Zmień połamane kredki w fajne pompki
Kredki push-up są nieco drogie i kupowanie wielu kolorów może po prostu nie być w Twoim budżecie. Czy jest lepszy sposób na pozbycie się starych połamanych kredek niż wykonanie własnych pompek? Możesz także pozbyć się tych pustych pojemników w sztyfcie w tym samym czasie. Wystarczy wyczyścić sztyfty kleju, a następnie wlać do nich stopioną kredkę. Dzieci mogą następnie w razie potrzeby przesuwać kredki w górę iw dół. To świetny projekt, w którym dzieci mogą Ci pomóc, ponieważ jest naprawdę łatwe i wcale nie powoduje bałaganu.
Instrukcje dla majsterkowiczów i kredyt na projekt - Infarrantlycreative

Zamień zepsutą ceramikę w designerskie donice
Możesz użyć połamanych talerzy, spodków, filiżanek lub czegoś podobnego, aby stworzyć piękne, designerskie donice. Po prostu użyj metody mozaiki, aby przymocować połamane kawałki do donicy z terakoty za pomocą mocnego kleju lub modowego podge. To świetny sposób na pokazanie swojej kreatywności poprzez tworzenie projektów i wzorów lub po prostu umieszczanie ich tam, jak chcesz. Twoje donice będą wyjątkowe i piękne i nie będziesz musiał wysyłać tych starych połamanych naczyń na wysypisko.
Instrukcje DIY i kredyt na projekt - Allfreecrafts

Twórz światła z rozbitych globów
Czy twój glob rozpadł się w szwach? Jeśli tak, a nie chcesz lub nie możesz go z powrotem skleić, użyj go do stworzenia tych naprawdę wyjątkowych świateł. Świetnie nadają się do pokoi dziecięcych, a jeśli chcesz, możesz je nawet mieć w kuchni. Są jednocześnie funkcjonalne i edukacyjne. Możesz pomalować wnętrze na kontrastowy kolor przed zamontowaniem świateł, aby naprawdę się wyróżniały lub po prostu pozostawić im naturalny kolor. Tak czy inaczej, te światła z pewnością wywołają rozmowę.
Instrukcje dla majsterkowiczów i kredyt projektu - Instructables

Zamień połamane kredki i puste słoiki w kolorowe świece
Puste słoiki lub wazony i kilka połamanych kredek mogą normalnie wylądować na stosie śmieci, ale możesz je połączyć i stworzyć naprawdę kolorowe świece. Po prostu rozpuść kredki i wlej je kolor po kolorze. Możesz to zrobić w starych słoikach Mason, aby uzyskać naprawdę rustykalną świecę lub użyć dowolnego szklanego słoika, który planujesz wyrzucić. To byłyby naprawdę fajne prezenty, gdybyś chciał połączyć parę w koszu, a ich stworzenie zajmuje bardzo mało czasu.
Instrukcje dla majsterkowiczów i kredyt na projekt - Notimeforflashcards

Zamień zepsutą biżuterię w nowe kawałki
Możesz wziąć połamane kawałki biżuterii i złożyć je razem, aby stworzyć oszałamiające bransoletki i bransoletki mankietowe, a to naprawdę nie trwa tak długo. Po prostu weź zepsutą biżuterię i kilka narzędzi do robienia biżuterii, jeśli je masz (jeśli ich nie masz, są naprawdę niedrogie w lokalnym sklepie z rękodziełem). Możesz stworzyć wyjątkowe i bardzo kreatywne elementy, które pasują do Twojego stylu lub stworzyć coś wyjątkowego na prezent. Nie ma potrzeby wyrzucania tych starych kawałków biżuterii, gdy są zepsute. Po prostu stwórz z nimi coś zupełnie nowego.
Instrukcje dla majsterkowiczów i kredyt projektu - Hellohydrangea

Twórz magnesy z uszkodzonej biżuterii
Weź stare połamane kolczyki, naszyjniki i bransoletki lub broszki i stwórz z nich piękne magnesy. Wystarczy przykleić klejnot do magnesu, a następnie użyć go, aby zachować piękną lodówkę lub tablice ogłoszeń. Jeśli masz większe kawałki, możesz zrobić z nich magnes lub złożyć mniejsze, aby utworzyć wzór, a następnie przykleić do magnesu. Gorący klej działa dobrze, utrzymując klejnoty na magnesach, a Twoja lodówka będzie wyglądać elegancko i oszałamiająco, gdy ubierzesz ją starą zepsutą biżuterią kostiumową.
Instrukcje dla majsterkowiczów i kredyt na projekt - Livelovediy

Zrób karmniki dla ptaków ze zepsutych filiżanek
Jeśli masz wyszczerbioną lub złamaną filiżankę i spodek, który planujesz wyrzucić, zamiast tego zrób z nich karmnik dla ptaków. Możesz je zrobić w około godzinę i potrzebujesz tylko filiżanki lub kubka, spodka, wodoodpornego kleju i czegoś, na czym można zawiesić karmnik. Dodaj swoje ptasie ziarno i pomyślnie zamieniłeś ten śmieć w skarb. Twoje ptaki pokochają nowy karmnik, a Ty pokochasz prostą elegancję posiadania pięknej filiżanki i spodka na swoim podwórku.
Instrukcje dotyczące majsterkowania i uznanie projektu - Blogglebeans

Zamień zepsutą biżuterię w szafki
Zepsute bransoletki, kolczyki i naszyjniki można wykorzystać do stworzenia pięknych szafek do łazienki lub kuchni, niezależnie od preferencji. Po prostu weź tę zepsutą biżuterię i przyklej ją do gwintowanego słupka. Możesz odebrać paczki gwintowanych słupków ze śrubami w lokalnym sklepie z narzędziami za około 1 USD. Użyj kleju epoksydowego lub czegoś podobnie mocnego, aby utrzymać klejnoty na miejscu. Większe kawałki biżuterii będą działać najlepiej lub jeśli masz mniejsze kawałki, możesz je przykleić do podstawy, a następnie przykleić do podstawy do słupka.
Instrukcje dotyczące majsterkowania i uznanie projektu - Threescoopsoflove

Zrób ozdoby świąteczne z uszkodzonymi płytami CD
Kiedy płyty CD zostaną zarysowane lub wyszczerbione, nie będą już działać prawidłowo. Zamiast wyrzucać je do kosza, użyj ich do stworzenia mini ozdób w kształcie kulek dyskotekowych, które mogą ozdobić Twoje drzewo w nadchodzące Święta Bożego Narodzenia. Wystarczy rozbić płytę CD (zakładając, że jest stosunkowo nadal nienaruszona), a następnie użyć pistoletu do klejenia na gorąco, aby przykleić te kawałki do szklanych ozdób. Możesz spróbować tego również z kulkami styropianowymi, jeśli chcesz, ale szkło działa znacznie lepiej. Za pomocą srebrnej płyty CD możesz zrobić przezroczyste szkło lub ozdobić ozdoby w różnych kolorach, aby uzyskać naprawdę kolorowy wygląd.
Instrukcje dla majsterkowiczów i kredyt na projekt - Cremedelacraft

Zrób miskę Potpourri ze zepsutego globu
Jeśli masz starą kulę ziemską, która jest w jakiś sposób zepsuta, możesz wziąć najlepszą połowę i stworzyć piękną miskę do ekspozycji potpourri lub jeśli pomalujesz wnętrze, możesz nawet użyć jej jako kapryśnej miski do serwowania. Będziesz potrzebować okrągłej drewnianej tabliczki do przyklejenia do dna kuli ziemskiej, aby utrzymać ją w poziomie, gdy jest pełna, ale możesz ją kupić w lokalnym sklepie z rękodziełem za niewielką cenę. Lub, jeśli masz kawałek sklejki, po prostu wytnij go samodzielnie. Następnie po prostu przyklej globus do połowy do podstawy i miej świetną miskę. Jeśli obie połówki twojego globu są w dobrym stanie, możesz zrobić dwie miski.
Instrukcje dla majsterkowiczów i kredyt na projekt - z premedytacją

Twórz szafki nocne ze zepsutego biurka
Jeśli masz stare biurko, które jest zepsute, zużyte lub uszkodzone w inny sposób, nie musisz go wyrzucać. Zamiast tego użyj go do stworzenia pasujących szafek nocnych. Nawet jeśli blatu nie da się naprawić, możesz zrobić szafki nocne z biurka, a następnie po prostu wyszlifować je i pomalować, aby pasowały do obecnego wystroju sypialni. Działa to najlepiej w przypadku biurek, które mają taką samą liczbę szuflad po każdej stronie lub możesz po prostu ustawić jedną podstawkę z biurka, jeśli chcesz, lub jeśli nie ma pasujących szuflad z każdej strony.
Instrukcje dla majsterkowiczów i kredyt na projekt - Sugarbeecrafts

Stwórz ławkę w stylu francuskim z połamanych krzeseł
Zamiast rzucać tymi starymi połamanymi krzesłami do jadalni, weź je i stwórz oszałamiającą ławkę inspirowaną francuskim. To jeden z najelegantszych projektów na zepsute meble i jeden z najłatwiejszych. Będziesz potrzebował dwóch krzeseł w tym samym stylu i będziesz musiał stworzyć drewnianą „skrzynkę” na ławkę. Następnie pomaluj go na dowolny kolor (biały nadaje mu bardzo elegancki wygląd) i dodaj lekką poduszkę. To świetne miejsce na nogę łóżka, przedpokój lub prawie każde inne miejsce w domu i możesz je zrobić praktycznie za darmo (w porównaniu do kupienia za setki dolarów).
Instrukcje dotyczące majsterkowania i uznanie projektu - Anoregoncottage

Zrób fajne wieszaki ze zepsutych krzeseł
Z oparć połamanych krzeseł można stworzyć bardzo oryginalne i fajne wieszaki. Musisz po prostu zdjąć oparcia (lub podnieść je, jeśli krzesło całkowicie się rozpadło), a następnie dodać osprzęt do wieszaka. Chociaż prawdopodobnie nie będziesz chciał zrobić z nich tony do zapełnienia swojej szafy, dają ci coś wspólnego z tymi połamanymi krzesłami, co jest przydatne i pomaga utrzymać te śmieci z dala od wysypiska. Poza tym są na tyle kapryśni, że robią wspaniałe prezenty.
Instrukcje dla majsterkowiczów i kredyt na projekt - Likecool

Zamień połamane krzesła w huśtawki trawnikowe
Krzesło, które straciło nogi, jest całkowicie bezużyteczne w jadalni, ale może być idealne do trawnika - to znaczy, gdy zrobisz z niego huśtawkę. Możesz wziąć stare krzesła i po prostu je pomalować, dodać okucia i zawiesić je na werandzie lub dużym drzewie na swoim podwórku. To świetny pomysł dla każdego, kto ma kilka krzeseł do jadalni, które rozważają wyrzucenie, ponieważ nogi nie są mocne. Po prostu zamień je wszystkie w huśtawki, pomaluj je na różne jasne kolory i udekoruj nimi trawnik.
Instrukcje dla majsterkowiczów i kredyt na projekt - Thisdiylife

Zamień zepsuty rower w stojak na garnki i patelnie
Do tego projektu nie potrzebujesz całego roweru, tylko koło. Koła rowerowe są idealnym rozmiarem do zawieszania garnków i patelni, a ponieważ są okrągłe, możesz z nich stworzyć stojak typu obrotowego, dzięki czemu Twoje garnki i patelnie będą zawsze łatwo dostępne. Wystarczy przymocować wiszący sprzęt do koła, aby można go było przymocować do sufitu. Następnie dodaj haczyki do garnków i patelni. To dobrze wykorzystuje zepsute rowery i zapewnia odrobinę organizacji w kuchni.
Instrukcje dla majsterkowiczów i kredyt projektu - Instructables

Zrób Szopkę Mobilną Z Zepsutych Rowerów
To wcale nie jest tak trudne, jak się wydaje. Tak naprawdę nie wieszasz rowerów, ale możesz zrobić świetny telefon z kołem zepsutego roweru. Koło idealnie pasuje do kształtu, a szprychy na kole świetnie nadają się do wieszania rzeczy. Byłby to również świetny pomysł w przypadku projektów układu słonecznego, w których planety, słońce i księżyc muszą wisieć po kolei. Okrągły kształt pozwala na łatwe obracanie telefonu i możesz dodać wszystko, co chcesz przyciągnąć uwagę malucha. Możesz nawet postawić na nim pozytywkę, jeśli chcesz.
Instrukcje DIY i uznanie projektu - Numinationavenue

Zbuduj ognisko ze zepsutej pralki
Do tego projektu nie potrzebujesz całej pralki - wystarczy wewnętrzny bęben. Możesz zbudować wielkie ognisko na podwórku i uratować część tej pralki przed wylądowaniem na wysypisku w tym samym czasie. Będziesz musiał użyć farby o wysokiej temperaturze i wymaga to trochę pracy, ale nie tak dużo, jak myślisz. Bęben spryskiwacza zapewnia doskonały kształt, dzięki czemu palenisko będzie idealne i naprawdę łatwe do wykonania. Wyobraź sobie, jaką radość będziesz mieć siedząc przy kominku w chłodne noce i oszczędzając przy tym trochę śmieci.
Instrukcje dla majsterkowiczów i kredyt na projekt - terapia mieszkania

Zamień zepsutą komodę w półkę
Jeśli masz zepsutą komodę, możesz użyć szuflad, aby zrobić wspaniałe półki na mapy. To świetnie, jeśli masz komodę, którą zamieniasz w coś innego i nie potrzebujesz wszystkich szuflad. Możesz dodać mapę do dolnej części szuflady, a następnie powiesić ją równo na ścianie, aby stworzyć półkę typu shadowbox, która pomieści małe przedmioty kolekcjonerskie. To taki łatwy projekt i nie wymaga, aby szuflada była w idealnym stanie, więc nawet jeśli dno wypadnie, możesz stworzyć te półki zamiast wrzucać tę starą komodę do kosza.
Instrukcje dla majsterkowiczów i kredyt na projekt - Olivebites

Zamień zepsute drabiny w regały
Zepsute drabiny z pewnością nie są czymś, z czego chcesz nadal korzystać. Jeśli masz starą drewnianą drabinę, której po prostu nie można bezpiecznie używać, nie wyrzucaj jej od razu. Zamiast tego rozłóż go na części i użyj dwóch sekcji jako pasujących półek na książki. Możesz stworzyć wspaniały rustykalny wygląd dzięki tym starym sekcjom drabin i powiesić je na ścianie lub po prostu posadzić na ścianie (oczywiście zakładając, że je wzmocnisz). Każdy szczebel drabiny pomieści książki, przedmioty kolekcjonerskie lub cokolwiek innego, czego potrzebujesz.
Instrukcje dla majsterkowiczów i kredyt na projekt - Barelymeasured

Zamień uszkodzony bęben pralki w stolik kawowy
Jeśli podoba Ci się industrialny wygląd lub po prostu chcesz mieć fajny i wyjątkowy stolik kawowy, wyjmij bęben z zepsutej pralki i umieść go na stole. Możesz przykryć górę okrągłym kawałkiem szkła (który chcesz wyciąć), a następnie użyć środka do przechowywania rzeczy lub stworzyć mały efekt shadowbox. Możliwości tego są nieograniczone. Jeśli wolisz, możesz również użyć drewnianego blatu lub zainstalować oświetlenie wewnątrz, aby stolik kawowy oświetlił salon.
Instrukcje dla majsterkowiczów i kredyt projektu - Instructables

Zamień uszkodzoną walizkę w stół
Zepsuta walizka (te ciężkie, zabytkowe) prawdopodobnie nie przyniesie ci wiele dobrego, chyba że poświęcisz trochę czasu, aby zmienić ją w coś naprawdę użytecznego. Dodając nogi do walizki, możesz stworzyć świetny stół, który idealnie sprawdzi się w salonie lub w nogach łóżka. Możesz przechowywać rzeczy w walizce, więc świetnie nadaje się do uporządkowania pokoju i ma naprawdę schludny wygląd w stylu vintage, który jest idealny dla tych, którzy kochają tego typu dekoracje.
Instrukcje dotyczące majsterkowania i uznanie projektu - Designsponge

Zmień przeznaczenie uszkodzonego fortepianu na stół warsztatowy
Masz stary fortepian, który już nie działa? Jeśli myślisz o wysłaniu go na wysypisko, nie rób tego. Zamiast tego możesz go użyć do stworzenia trochę miejsca do przechowywania i organizacji. Stare pianino ma idealny rozmiar i kształt do ukrytego stołu warsztatowego. Będziesz musiał usunąć część sprzętu z wnętrza fortepianu, aby zrobić miejsce na narzędzia i tym podobne, ale jest to świetne rozwiązanie do garaży lub warsztatów i znacznie tańsze niż wyjście i zakup ławki. Ponadto ławka fortepianowa doskonale nadaje się do przechowywania książek i czasopism.
Instrukcje dotyczące majsterkowania i uznanie projektu - Core77

Zamień uszkodzone walizki vintage w łóżka dla zwierząt
Twoje śmieci mogą być skarbem Twojego zwierzaka. Jeśli masz starą, zepsutą walizkę w stylu vintage, możesz uczynić swojego małego psa lub kota uroczym łóżkiem z tej walizki. Po prostu musisz zdjąć wierzch (aby nie zamykał się na twoim małym futrzaku), a następnie dodać wypełnienie do łóżka. Możesz również dodać nogi, a jeśli masz więcej niż jedno zwierzę, które potrzebuje łóżka, użyj górnej i dolnej części, aby zrobić dwa łóżka. To naprawdę zgrabny i bardzo łatwy projekt, który z pewnością zadowoli Twoje zwierzęta, a także doda odrobinę stylu vintage.
Instrukcje dla majsterkowiczów i uznanie projektu - Chaoticallycreative

Zamień bęben pralki w schludny stołek
Wyjmij bęben z zepsutej pralki, dodaj trochę farszu i masz idealny mały stołek. Możesz również dodać do niego nóżki z rolkami, aby nadać mu coś wyjątkowego. Możesz wypełnić środek farszem lub pomyśleć o utworzeniu czegoś w rodzaju góry, aby zakryć duży otwór bębna w środku. Umieść na nim siedzisko do wypychania i zdejmij je, abyś mógł wykorzystać wnętrze do przechowywania. To jest świetne dla dzieci. Możesz przechowywać ich kolorowanki lub inne zabawki w środku i mogą na nich siedzieć podczas zabawy.
Instrukcje dla majsterkowiczów i kredyt na projekt - Espritcabane

Zamień zepsutą wannę w kanapę
Naprawdę? Kanapa ze starej wanny na nóżkach? Absolutnie. Jest to nieco bardziej skomplikowane niż niektóre projekty zmiany przeznaczenia, ale warto byłoby stworzyć tę piękną i elegancką kanapę ze starej ceramicznej lub żelaznej wanny. Po prostu wycinasz przód, aby zrobić miejsce na kanapę, dodajesz farsz, a następnie malujesz, jeśli chcesz. Jeśli masz starą wannę, którą myślisz o wyrzuceniu, spróbuj zamiast tego stworzyć tę oszałamiającą kanapę. Możesz go używać w sypialni, salonie lub wszędzie tam, gdzie potrzebujesz trochę dodatkowego siedzenia.
Instrukcje dla majsterkowiczów i kredyt na projekt - Greenmoxie

Zamień zepsute sztućce w znaczniki roślin
Te stare, zgięte lub połamane łyżki i widelce nie muszą być rzucane. Zamiast tego pomyśl o przekształceniu ich w ręcznie stemplowane znaczniki roślin. To naprawdę schludny projekt, który nie tylko eliminuje stare sztućce, ale także daje naprawdę autentyczny i rustykalny ogród. Ten łatwy proces w rzeczywistości odciska nazwy w metalu, dzięki czemu będzie wyglądać tak, jakbyś miał utworzone niestandardowe markery, podczas gdy w rzeczywistości możesz je samodzielnie stworzyć ze sztućców, które były gotowe do kosza.
Instrukcje dotyczące majsterkowania i uznanie projektu - Mossymossy

Zrób piękny stojak telewizyjny ze zepsutej komody
Zamiast wyrzucać starą komodę, gdy szuflady nie działają prawidłowo, zamień ją w elegancką szafkę pod telewizor. Możesz wyjąć trzy górne szuflady, a pozostałe wykorzystać do przechowywania filmów, płyt CD lub akcesoriów do gier. Przy odrobinie szlifowania, malowania i kilku godzin możesz stworzyć centrum rozrywki, które wygląda tak, jakbyś zapłacił fortunę, ale w rzeczywistości kosztuje tylko kilka dolarów. Możesz to również zrobić w sypialni, a pozostałe szuflady wykorzystać jako szuflady komody, jeśli chcesz.
Instrukcje dotyczące majsterkowania i uznanie projektu - Domesticsuperhero

Włącz zepsuty monitor komputera do akwarium
To wymaga trochę pracy, ale jest całkowicie tego warte, szczególnie jeśli jesteś kimś, kto naprawdę lubi technologię. Możesz wydrążyć ten monitor i zrobić z niego wspaniały akwarium zamiast wysyłać go na wysypisko. Dzieci z pewnością uwielbiają ryby w monitorze komputera i jest on stosunkowo mały (w zależności od rozmiaru monitora), więc zajmuje bardzo mało miejsca. Zwróć uwagę, że dotyczy to monitorów starszego typu. Tak naprawdę nie da się tego zrobić na płaskim monitorze.
Instrukcje dla majsterkowiczów i kredyt projektu - Instructables

Zamień złamaną kolumnę w elegancki pasek
Tego starego pianina, które nie gra już melodii, nie trzeba rozrywać i wyrzucać. Możesz z niego zrobić piękny batonik, który z pewnością będzie hitem wszystkich Twoich przyjęć koktajlowych. Będziesz musiał wyjąć rzeczywiste partie, a następnie pomalować lub zabrudzić fortepian na dowolny kolor. Spód kluczy można zamienić w świetny uchwyt na kieliszek, a lusterko z tyłu dodaje mu elegancji. Cóż za wspaniały sposób na oddanie hołdu temu staremu fortepianowi!
Instrukcje DIY i kredyt na projekt - Househoneys

Zrób półkę z tej złamanej gitary
Jeśli masz gitarę, której po prostu nie da się już stroić lub jest w jakiś sposób zepsuta, zamień ją w naprawdę zgrabną półkę. Będziesz musiał usunąć przód gitary (miejmy nadzieję, że nie spowoduje to dalszych uszkodzeń grzbietu i szyi), a następnie po prostu dodać półki do środka. Zawieś to na ścianie w pokoju swojego miłośnika muzyki lub trzymaj w salonie, aby wszyscy mogli podziwiać. Jest to doskonałe miejsce do przechowywania płyt CD i innych akcesoriów muzycznych lub jako półka na nuty.
Instrukcje dotyczące majsterkowania i uznanie projektu - Diybudgetgirl

Użyj połamanych kieliszków, aby nadać roślinom elegancji
Zamiast wyrzucać złamane kieliszki, użyj ich, aby oświetlić rośliny. Kiedy łodygi kieliszków zostaną złamane, będą ładnie pasować do roślin doniczkowych. Po prostu umieść je w ziemi przy roślinie i dodaj świeczkę tealight do rzeczywistej części szklanej. To wspaniały projekt, który zajmuje tylko kilka sekund i może być używany zarówno do roślin wewnętrznych, jak i zewnętrznych. Uważaj, aby nie skaleczyć się o szybę. This works with any glass that has a stem for the base.
DIY Instructions and Project Credit – Dumpaday

Turn A Broken Refrigerator Into An Outdoor Ice Chest
If your fridge is broken and you’ve had to replace it, you may think that hauling the old one to the dump is the next step. Instead, turn that broken fridge into a great outdoor ice chest. You have to be sure to remove everything that causes the fridge to run (or did before it broke). Then just cover it with wood (cedar works really well) and create an ice chest that is perfect for your outdoor kitchen or deck. You can use the racks and baskets from the fridge for holding items inside the chest.
DIY Instructions and Project Credit – Reddit

Make A Kitchen Utensil Holder From A Broken Rake
When the handle breaks on your rake, don’t automatically trash it. You can use the rake part to create a really neat and rustic looking holder for kitchen utensils. You just have to clean the rake top up a bit to remove any rust and you may want to think about sanding and painting it if it’s really rusty. Then just hang it on the wall and stick your spoons and ladles on it. This is also a great project for holding tools in the garage or tool shed and you don’t really have to clean it up for that.
DIY Instructions and Project Credit – Community

Create A Basket From Broken Blinds
Broken mini blinds normally find their way to the trash can. After all, what could you possibly do with them other than throwing them away? You could actually use them to make a very neat little basket that takes very little time. You just use a weaving method to create the basket and remember to staple together as you go along so that the basket is sturdy. If you have pets that tend to tear up your mini blinds, use them to make baskets instead of tossing them. These baskets are perfect for holding office supplies or just about anything else you can think of.
DIY Instructions and Project Credit – Stephagruss

Make A Wineglass Holder From A Broken Rake
Keep the top of that old rake when it breaks and create a rustic wineglass holder. The sections of the rake top are perfect for holding stemmed glassware and it gives you a great country look. You can simply sand away any rust that may be on the rake and hang it in its natural form or you can paint it with spray paint if you need it to be a specific color to match your kitchen or dining room décor. This is a great project for those old rakes that have broken handles but the tops are still in good condition.
DIY Instructions and Project Credit – Tatteredstyle

Create A Beautiful Chair From Broken China
Instead of throwing out that china when it’s broken, use it to create a stunningly beautiful mosaic chair. This chair is relatively easy to make considering how complicated it looks and it’s a great way to preserve old china that you may simply not want to get rid of even when it’s broken. You just take the broken pieces and put them together on an old chair base in whatever pattern you want. You can use larger pieces or create a smaller mosaic pattern if you have smaller broken pieces.
DIY Instructions and Project Credit – Dishfunctionaldesigns

Build Picture Frames From Broken Mini Blinds
Old mini blinds that are no longer fit to hang aren’t necessarily trash. You can take those blinds and create picture frames in a number of sizes and colors. No matter what material your blinds are made of, you can make beautiful frames for your favorite pictures that are unique and will help you to save money on buying frames for those prints. You just have to measure the pictures that you want to frame so that you have an idea of how many pieces of the blind you need. Then just stack and staple the pieces together to create your frame.
DIY Instructions and Project Credit – Domesticimperfection

Use Chipped Teacups As Curtain Tiebacks
Instead of throwing out those decorative teacups or putting them in the back of a cabinet, use them to create elegant Victorian looking curtain tiebacks. You will need to cut a hole in the bottom for the curtain to come through and then screw a cup hanger into the window frame so that the handle of the cup can be hung. This is a beautiful look and is perfect for formal dining rooms, especially near the china cabinet where you have other dishes in the same pattern sitting.
DIY Instructions and Project Credit – Bhg

Make A Kindle Cozy From Torn Jeans
If you have old dishes that have seen better days, you can use them to create beautiful lighting for your kitchen or breakfast nook. You need cups and saucers in the same pattern or you could use different patterns and make it really unique and interesting. You will need to attach the lighting and this is better done on a wooden plank so that you can keep all of the cups and saucers straight and even. This is a neat project though and one that really won’t take you long.
DIY Instructions and Project Credit – Punkprojects

Make Lighting From Chipped Cups and Saucers
If you have old dishes that have seen better days, you can use them to create beautiful lighting for your kitchen or breakfast nook. This is a neat project though and one that really won’t take you long.
DIY Instructions and Project Credit – Apartmenttherapy

Turn Broken Shutters Into Garden Holders
A broken shutter and some mason jars give you the perfect materials to create a little mini garden for the home or yard. You just have to clean up the shutter, paint if you want and then add the mason jars which are held in place with hot glue. If you are planning to add heavier plants, use clamps. You can cover them up with twine or ribbon. This is great for a kitchen herb garden and keeps you from having to haul those old shutters off to the dump.
DIY Instructions and Project Credit – Sheknows

Use Broken Records To Make Bookends
Have some old vinyl records that are scratched beyond repair? You can use those records to make really cool bookends, which are perfect for teenager’s bedrooms or family rooms for the musically inclined. There is a really easy method that will allow you to bend the bottom of the records so that they sit flat on a surface. Then you just have to add your books. This is also a great way to organize those records or CDs that you have lying around. Just create the bookends from torn or scratched records and use them to keep good ones in place.
DIY Instructions and Project Credit – Homesessive

Create A Bulletin Board From Broken Mattress Springs
If you have smaller mattress springs (think baby bed mattresses or twin beds) you can use those springs to make really useful bulletin boards. This is actually a really neat project that you can customize however you want. Add a mirror, some shelves or just whatever else you want and then just sit the springs up against the wall near your desk. You can also hang it on the wall with some sturdy hardware which is great if you don’t really have floor space available.
DIY Instructions and Project Credit – Funkyjunkinteriors

Turn A Broken Door Into A Shelf
After you replace that broken door and before you throw out the old one, consider turning it into a glorious shelf. You can add fabric, batting and even lighting to create a wonderfully unique shelf that is as functional as it is lovely. The door can stand in the corner or up against a wall or you could add hardware to it for hanging. Older doors give you a great rustic look and you can add as many shelves as you need. Plus, the lights help to illuminate your favorite books or collectibles.
DIY Instructions and Project Credit – Bulbtoblossom

Make A Pot Rack From A Screen Door
If you have a broken screen door and you are considering replacing it, keep the old one. You can use that door to make a very roomy and very attractive pot rack for your pots and pans. Just repaint or re-stain the door and then use chains to hang it from the ceiling. You can add hooks to the screen part for hanging pots and pans and keep lids or other items on top so you get loads of organization and all from that broken screen door that you were planning to throw away.
DIY Instructions and Project Credit – Thekitchn

Turn A Broken Suitcase Into A Medicine Cabinet
Forget throwing that old vintage suitcase away. Even when it’s broken, that suitcase can be used to create a great looking and fully functional medicine cabinet. Just clean out the inside, add some small shelves and you have the makings of a beautiful vintage medicine cabinet that will bring to mind those old traveling medicine men. Add screws to the back to hang it on the wall and if you don’t really need to close the door, you can attach it to the wall open and add shelves on both sides.
DIY Instructions and Project Credit – House-capades

Make Shelves From Torn Books
If you have a few hardcover books that are missing pages or otherwise no longer being read, you can turn them into literal bookshelves. These are really neat and require very little work. In fact, you just have to hang a shelf bracket and then slide the book in. You can create an entire wall of these “book” shelves in just a few minutes and they are great for the bedroom of your favorite bookworm. They also work well in hallways to hold knick-knacks or just anywhere you need them.
DIY Instructions and Project Credit – Realsimple

Turn A Broken Door Into A Coatrack
Take that old broken door, add a few coat hooks and perhaps some mirrored pieces and you have a beautiful coatrack that is perfect for your entryway or mud room. You can do this with even a small piece of a broken door and then just stain or paint it whatever color you need to match your existing décor. If you have an entire door, you could add shelving or create cubbies to hold shoes and other items in the mud room. This is a great repurpose idea for old doors and for organization as well.
DIY Instructions and Project Credit – Prettyhandygirl

Create Napkins From Torn Denim
If your closet is filled with torn jeans that you are tempted to throw away, think about making a few denim napkins first. You can create beautiful napkins with minimal sewing and these are great for summer cookouts. You basically just fold and sew the denim and you can create pockets for holding silverware. This is an easy project and one that you can work on with different materials so whether you have old jeans in the closet or any other clothing that is ripped or stained, you can make napkins from any of it.
DIY Instructions and Project Credit – Yourpocketstylist

Make A New Aquarium From That Broken Old TV
If you have an old console television that no longer works – or a smaller TV for that matter – you can use the base to create a beautiful new aquarium. You will need to be very careful when removing the electronic pieces of the television and when installing the glass and other aquarium parts. This is a great weekend project and if you do have a console television, you will end up with a great aquarium that sits on the floor. The top of the TV is turned into a lift-off lid so you can feed your fish and tend to the aquarium parts as they need serviced.
DIY Instructions and Project Credit – Apartmenttherapy

Make Mirrors From Broken Rackets
Instead of trashing those tennis rackets when the insides come loose, turn them into sporty mirrors. You simply have to remove the netting from inside the racket and then add a mirror to fit that space. You may need to take the measurements (or the entire racket if it’s easier) to a glass cutter to get a mirror shape that will fit perfectly. Then just attach the mirrors to the rackets and hang them in your little tennis player’s bedroom or anywhere in the house.
DIY Instructions and Project Credit – Countryliving

Make A Garden Trellis From Broken Tennis Rackets
When you have several tennis rackets that are no longer fit for use (or you could use badminton rackets for this as well) you can turn them into a really nice looking trellis for the garden. This is great for homes with tennis players and it gives you something to do with those rackets instead of simply throwing them away. You just have to gather and group your rackets together, prepare a frame for them and then assemble it. You can paint them all the same color or go with different colors if you want something a bit bolder.
DIY Instructions and Project Credit – Apartmenttherapy

Turn Broken Drums Into Lights
If you have a drummer in the family and you happen to have a broken drum set, you can make gorgeous drum lights. These are great for the bedroom of your rock star or you could use them in a family room or rec room, whatever you prefer. They are relatively easy to make and can be easily hung from the ceiling. The drums work perfectly as lights and are a great touch if you are looking for something a bit out of the norm for your lighting. Plus, it keeps you from adding those drums to your local landfill.
DIY Instructions and Project Credit – Makelyhome

Create Stuffed Animals From Turn Gloves
If your gloves tend to only last one season before they rip or tear, you can make them last a bit longer by turning them into adorable stuffed animals. This is a great project to begin for the Christmas season as these little cuties make wonderful gifts for all the kids on your list. This is also a good project if your gloves have the fingertips missing because you will remove them anyway. You will have to do a bit of hand sewing but the project is really easy overall.
DIY Instructions and Project Credit – Boredpanda

Make Chainmail From Pop Tabs
Okay, so you would probably be throwing out those pop tabs with the cans, right? If you want, you can use those tabs to create a fabulous chainmail purse. It takes a little preparation and cutting to get the tabs ready but once you are done with that, you can simply put them together and create any number of chainmail items. You can do anything from a purse to a costume to picture frames or just about anything else that you can think of to create from your homemade chainmail.
Instrukcje dla majsterkowiczów i kredyt projektu - Instructables

Turn Toilet Paper Rolls Into Art
Okay, so they’re not technically broken but empty toilet paper rolls belong in the trash, right? Well, maybe not. You can actually use them to create stunning wall art so if you tend to like recycling, this is the perfect project for you. You can do this in any number of designs and the paint can be in any color that you need. No one but you will know that your elegant art actually began life as a cardboard toilet paper roll and you can help to minimize your trash by not having as many rolls to throw out every week.
DIY Instructions and Project Credit – Cutoutandkeep

Make Birdhouse Stands From Broken Ladders
When your old wooden ladders are no longer safe for you to stand on, you can turn them into beautiful stands for your birdhouses. This works with ladders of all sizes. If they are wooden, just paint them or leave them as they are if you want something a bit aged and rustic looking. You simply have to sit the birdhouses on top of them and you may want to attach them with a screw to keep them secure. You could have these sitting all over your garden area.
DIY Instructions and Project Credit – Hometalk

Turn A Broken Bed Into A Bench
An old headboard and footboard can be used to make a wonderful corner bench for the little ones. You just have to attach the two together, create the actual seat and then paint or stain the color that you want. Add a cushion and your little ones will adore sitting here to eat or play. You could use this in the dining room or put it outside on the deck if you need extra seating out there. It’s an easy project and a great way to use up those old parts from your broken beds.
DIY Instructions and Project Credit – Myrepurposedlife

Make A Beautiful Bench From That Broken Dresser
This is a great project for dressers that have several broken drawers. While you may want a couple of the drawers to work properly for use on the bottom, the rest of the dresser is basically removed to create the bench. You can then use the bench at the foot of your bed or even on a deck if you need additional outdoor seating. Paint or stain any color and create something that perfectly matches your existing furniture. This is an easy project that will take you less than a day to complete and keeps you from throwing out that broken dresser.
DIY Instructions and Project Credit – Prakticideas

Create Stunning Jewelry From Broken Clothespins
If you have had your clothespins for long, you may notice that the wood has begun to chip or pull completely apart from the spring. Go ahead and pick up new clothespins but save those old broken ones to create stunning jewelry. This is such an easy project and one that doesn’t require any special tools. Plus, it’s a great gift idea that is not only cheap but allows you to use up those springs instead of tossing them out. You can create pendants, earrings or even charm bracelets with them.
DIY Instructions and Project Credit – Michlinla

Create Pedestal Picture Frames From Broken Materials
Take those broken or mismatched candlesticks and those picture frames that no longer hang or sit upright and create elegant pedestal frames that are perfect for gift giving or keeping all to yourself. Just spray paint the frames and candlesticks the same colors and then glue them together once the paint has dried. These are so very easy to make and are perfect for older frames that no longer want to sit where they should. Plus, you can use those candlesticks that you don’t have any other use for.
DIY Instructions and Project Credit – Fancyfrugallife

Create Storage From Torn Books
While you may balk at the thought of tearing up your old books, if you have any that are already torn then this is a great project. You simply hollow out those hold books and use them to store your belongings. You leave the outside intact so when you add them to your bookshelves, they look like real books. You can use them to store items safely out of view and they are really easy to make. You can do one at a time or create a little nook with several book covers.
DIY Instructions and Project Credit – Sewingbarefoot

Use A Broken Door To Make A Crafting Table
A broken door that you can’t really use on your home any longer is perfect for creating a colorful crafting table that your little ones will love. You just use the door as the top and then place it on cube organizers which work to hold all of your little ones’ craft supplies. Actually, if you made it tall enough this would even work as an adult’s crafting table so it just depends on what you need. You can cover the door with fabric or just paint it the color that you want.
DIY Instructions and Project Credit – Marthastewart

Make A Lamp From A Broken Shovel
Have a broken shovel that you are planning to throw away? Before you do, take a look at this wonderful shovel lamp. It’s really easy to make and this is perfect for lighting up the pathway outside your garden area. Imagine the pattern that you could create if you had several of these. You could also use them for added lighting in the garage or in a workshop or just put them right there in the kitchen. You can spray paint your shovel whatever color you need so it’s easy to match the lamp to your existing décor.
DIY Instructions and Project Credit – Project-re

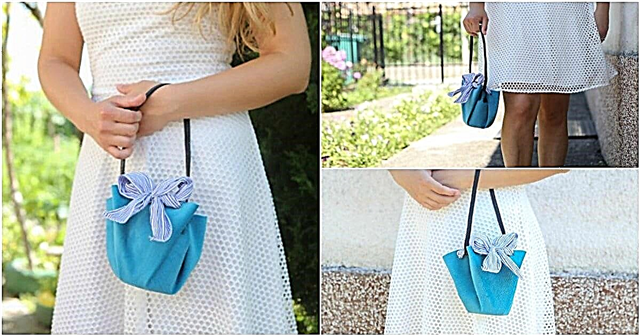
Create A Sporty Bag From A Torn Basketball
Basketballs don’t stay up forever. In fact, cheaper ones will begin losing air rather quickly and depending on the size of the hole in them, you may not be able to air them up again. When that time comes, you don’t have to toss them. You can make a fashionable and really cute bag from them that is perfect for any girl who is into sports. Note that you can do this with a volleyball or football as well so this is a great gift idea for your little cheerleader or a sports mom who is really supportive of her players.
DIY Instructions and Project Credit – Project-re

Turn A Torn Shower Curtain Into A Play Mat
When your shower curtain liner gets a hole or when the tops tear and you can’t keep it on the hooks any longer, you can turn it into a wonderful play mat that your children will adore. You can let the kids create roads and cityscapes for their toy cars or use dry erase markers and let them color their favorite pictures over and over again. Dry erase will wipe easily from the plastic liner so this is a great way to keep the kids busy and give them loads of creativity at the same time.
DIY Instructions and Project Credit – Filthwizardry

Keep Buttons From Torn Clothing for Jewelry
When you have a shirt or sweater that is torn or permanently stained, take a minute to remove the buttons before trashing the clothing. You can use those buttons to create beautiful button bracelets that are fun and would make the perfect inexpensive gift for someone special. You just cut a piece of elastic in the size you need, sew the ends together rather tightly and then sew on the buttons. You can create any number of designs and patterns and each bracelet can be completely unique.
DIY Instructions and Project Credit – Lillyella

Use Broken Dishes And Silverware To Make Wind Chimes
Have some broken china that you can’t bring yourself to part with? Or, perhaps you have some vintage silverware that can no longer be used for eating but you just hate to throw it out. Use those pieces to make beautiful wind chimes that you can hang from your porch. This lets you keep those dishes that you don’t really want to throw away and they make a beautiful sound when the wind blows. You could also use broken costume jewelry as accents if you have any on hand so this is a great project for using up a lot of your broken household items.
DIY Instructions and Project Credit – Songbirdblog

Turn A Broken Chandelier Into A Serving Tray
A broken chandelier (one that no longer works as opposed to one that is actually broken into pieces) makes a beautiful dessert tray. You will need to remove all of the hardware for the lighting from the base and each individual light. Then simply attach china plates to the places where the lights used to hand and use those plates for serving up your favorite desserts. This is a great project for upcoming weddings or is perfect for the Holidays when you want an elegant dessert tray. Broken costume jewelry like faux pearl strands are great for embellishing the tray.
DIY Instructions and Project Credit – Dreaming-n-color

Make Rag Rugs From Torn Clothing
Those old t-shirts that are no longer wearable and just about any other clothing that you may have that is ripped or torn can be used to make wonderful rag rugs. This is also a great project for torn sheets and even curtains in certain fabrics. You can use different clothing materials and colors to create a multi-colored rug or use sheets and old blankets in the same colors for something a bit more elegant. These rugs are perfect for the kitchen in front of the sink or you could use them in the bathroom as bath mats.
DIY Instructions and Project Credit – Littlehouseliving

Use Knobs From Broken Doors For Patio Flooring
Before you throw those old doorknobs away, even if the doors are completely useless, you can turn the knobs into beautiful flooring for your outdoor patio. Actually, you can also use those old burners from your stovetop that no longer work and other items around the house that are broken or otherwise trashcan bound. The different finishes will give your patio a great look and the pieces are very stable when you set them in soil and surround them with your favorite outdoor plants.
DIY Instructions and Project Credit – Sunset

Turn Doorknobs Into Wine Corks
When your doors are broken and in need of repair, keep the doorknobs and use them to create these beautiful and very unique wine corks. All you need are the decorative doorknobs and some cork, which you can buy at any craft or hardware store. You could also just use the cork that comes in your wine bottles if you wanted. This works best with old knobs that have screws in them or you could use old cabinet pulls if they are decorative enough. You simply have to push the screw into the cork by turning and get ready because this could take a bit of time. The end result however, is well worth the effort.
DIY Instructions and Project Credit – Brokegirlsguide

Empty Tin Cans Make Great Hairbrush Holders
While tins cans aren’t really broken, they are useless once you get the food out, right? Instead of adding them to your trash heap, use those cans to make wonderful holders for your hairbrushes. You just have to remove both ends of the cans, clean them very well with warm soapy water and then cover them with Washi tape, paint, wallpaper or just about anything else you want. Fabric works very well and hot glue does a good job of holding your cover in place. Then attach them with screws to the inside of your vanity door and you have a great place for storing and organizing brushes.
DIY Instructions and Project Credit – Thecreativeimperative

Turn Broken Picture Frames Into Decorative Molding
If you love the look of picture frame molding but aren’t really a fan of the cost, you can make your own with those old broken picture frames. If you have frames that have lost their backing or their glass has been broken, you just remove all of that, paint them the color that you want your molding to be and then hang them on the wall. You can use frames that are all the same size or create a pattern from frames of different sizes. This is a great look and one that seems expensive. Only you will know that you have salvaged trash to create it.
DIY Instructions and Project Credit – Bobvila

Make A Jewelry Holder From Broken Spindles
When stair spindles are broken, they may seem useless. You can however, repurpose them into gorgeous jewelry holders that are unique and very creative. You just have to paint them, add a base and then use them to keep your necklaces and bracelets from getting tangled. If you are looking for a unique gift idea and one that won’t cost a fortune, this is a good one. The best part is you make it from something that you were probably just going to throw away. You could also use an old drawer pull or broken costume jewelry to decorate it.
DIY Instructions and Project Credit – Sublime-living

Use Bent and Broken Silverware For Drawer Pulls
Instead of throwing out that old silverware when it bends or breaks, use it to make cabinet door handles instead. This is actually a really popular look and one that may cost a bit if you went out and bought all of those handles. Instead, you can make your own with silverware that you were planning to toss. If you have silverware that is tarnished beyond repair, simply clean it up a bit and paint it if you want to create rustic looking handles that look much more expensive than they are.
DIY Instructions and Project Credit – Whiteleycreek

Make Good Use Of A Broken Binder
When binders break, they are normally trash. After all, they’re really not that expensive and most people simply throw them out without considering what could be done with them. If you cut away the actual cover part, you can use the binder as a key holder. Just attach it to any wall with screws, which will fit nicely into the holes already in it, and then use it to hold keys or put it outside on the deck to hold grilling utensils, towels by the pool or anything else you need. You can paint it if you want or even mount a few of these onto a wooden base.
DIY Instructions and Project Credit – Upcycleus

Create A Stunning Table From A Broken Piano
There really isn’t a lot that you can do with an old piano when it stops working. You can however, create beautiful shadowbox type tables and depending on the size of your piano, you may be able to make two of these for the living room. You use the keys on the inside of the table to give it a really neat musical look and then cover with glass that you can have cut at your local hardware store or glass cutter. These are beautiful and help to somewhat preserve the look of the piano so you don’t really have to throw it all away. You can keep the best parts.
DIY Instructions and Project Credit – Trash2treasure

Turn Leaky Buckets Into Outdoor Serving Items
Those old leaky buckets are useless when it comes to holding liquid but they will serve as holders for your outdoor eating very nicely. You just take some time to give the bucket whatever look you want and then use it for holding silverware, napkins or other solid items when you eat out. Give it a great patriotic look and use it for your 4th of July table outside. It doesn’t take very long to create something great out of an otherwise useless bucket.
DIY Instructions and Project Credit – Hometalk

Make Soap Dispensers From Glass Bottles
If you tend to buy things in glass bottles (like certain bottled waters or wines for instance), you don’t have to necessarily chuck the bottles when they are empty. You can use them to make soap dispensers that are gorgeous and really functional. You will need to get some pumps which you can buy at a craft store or you could just preserve the pump from lotions if you want. Then just clean up and even decorate the bottles with broken jewelry, mosaics made from broken china or anything you want and fill with your favorite liquid soaps.
DIY Instructions and Project Credit – Theredchairblog

Make Coasters From Old Wine Corks
Instead of throwing out the corks when you are finished with the wine, use them to create great coasters. This is a great project for corks that no longer serve their purpose because they don’t need to be in perfect shape to make coasters. The coasters have a great beach-y look to them and they are easy to put together. You need a hot glue gun to attach them to each other and then just tie them off with ribbon or twine, whatever your preference. These are absolutely adorable and such a wonderful way to reuse those old corks.
DIY Instructions and Project Credit – Thefrugalnavywife

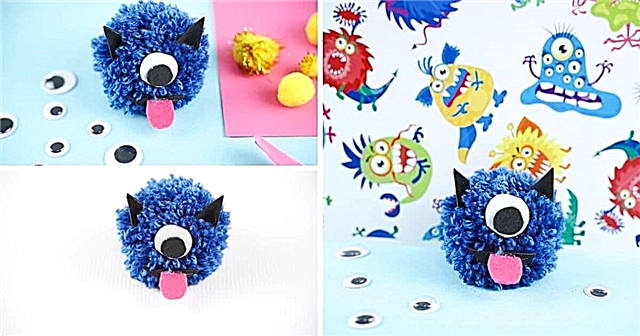
Make Monsters From Bread Clips
Once the bread is gone, you normally throw out the clips, right? Some people do use them for other things and if you are one of those people, this is a great Halloween project for you. You can turn those clips into adorable monsters that you hang on DIY garland to decorate for the holiday. Just paint monster faces on your bread clips and this works with clips of all sizes, even the ones that may be broken or chipped. Once you have your monster faces done, just clip them all onto a rope or string for hanging.
DIY Instructions and Project Credit – Craftyladylindsay

Create Berry Basket Snowflakes
Okay, so normally you would throw out those plastic berry baskets, especially if they’re broken. Before you do however, take a look at the beautiful snowflakes that you can create with them. This works well even with baskets that are broken or ripped. You really just need the bottom of the basket and it’s ok if the bottom is a bit worse for wear as well. Just create the snowflake shape and then glue and dip in glitter. These are great for hanging outdoors for the Holidays or you could even use them to decorate the tree.
DIY Instructions and Project Credit – Alphamom